Creating vSphere VM templates with Packer (part 6) - CentOS
Having created a Windows template, in Part 6 of this series it's now time to make one for Linux using my go-to distro, CentOS 8.

With Windows sorted, it's time to turn my attention to Linux. I'm going to use CentOS as it's pretty close to RedHat and a lot of the companies I work with use that. Ubuntu and VMware Photon are both on my to-do list but I won't be covering them in this blog series.
As with my previous Windows template post, I'll cover the Variables, Builders and Provisioners used. I'll skip over anything that's the same as for my Windows post and focus on the bits that are different. Buckle up!
Variables
There are only minor differences here from the variables that I used previously.
{
  "variables": {
    "var_vm_name":              "centos8_vsphere_{{isotime \"20060102_1504\"}}",
    "var_vm_guestos":           "centos8_64Guest",
    "var_vm_cpu_count":         "1",
    "var_vm_ram_size":          "1024",
    "var_vm_disk_controller":   "pvscsi",
    "var_vm_disk_size":         "16384",
    "var_vm_notes":             "1.0-{{isotime \"20060102_1504\"}} (CentOS-8.1.1911-x86_64-dvd1.iso)",
    "var_iso_path":             "os/centos/8/CentOS-8.1.1911-x86_64-dvd1.iso",
    "var_guest_username":       "v12n",
    "var_guest_password":       "VMware1!"
},- var_vm_name - The name the VM template gets in vCenter.
- var_vm_guestos - This tells vSphere the VM's OS is CentOS 8 64-bit.
- var_vm_cpu_count - This is the number of vCPUs the VM should be configured with. I configured my VMs small so that they can be scaled up if required.
- var_vm_disk_controller - This is the type of disk controller that should be configured. It's standard for CentOS VMs in vSphere.
- var_vm_disk_size - This is the size of the system disk (in MB) that I want my VMs to be created with. I've kept it small so that I can expand it later if required.
- var_vm_notes - This is the value that I want written in to the VM's annotations field.
- var_iso_path - The relative path to the ISO file from which I want to install. This will be appended later to the ISO datastore that I defined in my vSphere variables in a previous post.
- var_guest_username - The user name of the user that Packer will use to connect to the VM after the OS is installed and it first boots. It matches the name I set in the KickStart configuration file for installing CentOS later.
- var_guest_password - The password for the user above.
Builders
I'm only creating one CentOS 8 template at the moment so there is only one Builder definition.
"builders": [
    {
      "type":                   "vsphere-iso",
      "name":                   "CentOS8-minimal",

      "vcenter_server":         "{{user `var_vsphere_vcenter`}}",
      "username":               "{{user `var_vsphere_username`}}",
      "password":               "{{user `var_vsphere_password`}}",
      "insecure_connection":    "true",

      "datacenter":             "{{user `var_vsphere_datacenter`}}",
      "cluster":                "{{user `var_vsphere_cluster`}}",
      "folder":                 "{{user `var_vsphere_folder`}}",
      "datastore":              "{{user `var_vsphere_datastore`}}",
      "network":                "{{user `var_vsphere_network`}}",
      "convert_to_template":    "true",

      "vm_name":                "{{user `var_vm_name`}}",
      "guest_os_type":          "{{user `var_vm_guestos`}}",
      "CPUs":                   "{{user `var_vm_cpu_count`}}",
      "RAM":                    "{{user `var_vm_ram_size`}}",
      "disk_controller_type":   "{{user `var_vm_disk_controller`}}",
      "disk_size":              "{{user `var_vm_disk_size`}}",
      "disk_thin_provisioned":  true,
      "network_card":           "vmxnet3",
      "notes":                  "{{user `var_vm_notes`}}",

      "communicator":           "ssh",
      "ssh_username":           "{{user `var_guest_username`}}",
      "ssh_password":           "{{user `var_guest_password`}}",

      "iso_paths":              ["{{user `var_vsphere_iso_datastore`}} {{user `var_iso_path`}}"],
      "http_directory":         "centos/http/8",
      "http_port_min":          8601,
      "http_port_max":          8610,
      "boot_command":           ["<up><wait><tab><wait> text ks=http://{{ .HTTPIP }}:{{ .HTTPPort }}/ks.cfg<enter><wait>"],
      "shutdown_command":       "echo '{{user `var_guest_password`}}' | sudo -S -E shutdown -P now",
      "remove_cdrom":           "true"
    }
],Over 50% of the builder definition is the same as for the Windows template, but of course the variables passed to the options differ slightly. Where things differ however is with the communicator and the use of a transient HTTP server.
Instead of using WinRM, the communicator of choice is SSH. Packer uses this to connect to the provisioned VM and execute any additional configuration that I want using BaSh scripts. It connects using the credentials specified in the Variables section, i.e. the v12n user.
As CentOS recognises both the ParaVirtual SCSI adapter and the VMXNET3 network adapter, the installer has network access so we don't have to faff with floppy disks. Instead we have the option to provide the VM with access to a KickStart file to get the OS installed. At execution time Packer can create a transient HTTP server to serve up that file. The http_directory and http_port* settings govern that behaviour. For it to work however, the ports specified must be open for TCP access and the provisioned machine must be on a network with DHCP and be able to route to the host running Packer.
The reason for this is that boot_command option contains the key strokes that Packer sends to vSphere after the VM is powered on. If you watch the VM's console at this time you'll see the key presses get echoed in the VM. What the sequence does is skips the media test and appends "text ks=http://packeripaddress:httpport/ks.cfg" to the boot command. This executes a text-based installation of CentOS using the settings from the ks.cfg file. Neat, huh?
The contents of the KickStart file are pretty standard and I've included mine in the GitHub repository below. The one section I wanted to call out though was this one, right at the end:
echo "v12n        ALL=(ALL)       NOPASSWD: ALL" >> /etc/sudoers.d/v12n
sed -i "s/^.*requiretty/#Defaults requiretty/" /etc/sudoers
It adds my v12n user to sudoers so that when Packer connects later it can issue commands using sudo. Access to SSH using the root account is not enabled.
Provisioners
The final section of the Packer file is again the Provisioners section.
"provisioners": [
    {
      "type":                   "shell",
      "execute_command":        "{{.Path}}",
      "scripts": [
                                "./centos/scripts/install-sshkeys.sh"
      ]
    },
    {
      "type":                   "shell",
      "execute_command":        "echo '{{user `var_guest_password`}}' | sudo -S -E bash '{{.Path}}'",
      "scripts": [
                                "./centos/scripts/configure-sshd.sh",
                                "./centos/scripts/8/update.sh",
                                "./centos/scripts/install-certs.sh",
                                "./centos/scripts/8/cleanup.sh"
      ]
    }
  ]
I configured two provisioners. The first runs as the v12n user and adds the public SSH key for my Ansible server so that Ansible can connect and manage the host.
The second provisioner runs four scripts using sudo privileges:
- Configure SSHD - This script enables authentication to SSH using keys.
- Update - This script calls DNF and applys updates to any packages.
- Install Certs - This script copies my CA certs from the Certificate Authority and installs them as trusted.
- Cleanup - Anonymises the OS and cleans up some log files etc.
Finalizing
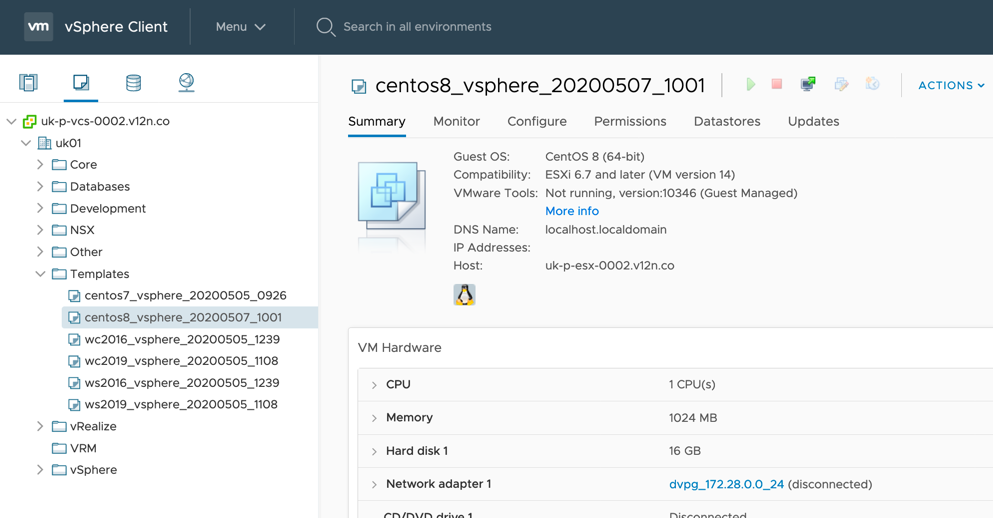
Once Packer detects that the VM is powered off, the final steps are to remove the CD drive and convert the VM in to a template. And here it is:
In my final post of this series, I'll briefly cover off some of the plans that I have for taking this forward.
Other posts in this series:
- Introduction
- Configuring Packer server and required files
- Variables, builders and provisioners
- vSphere variables
- Windows Server templates
- CentOS templates <-- $this
- Further plans (including scheduling packer)
My public Packer repository:
 mpoore