Replacing CentOS NTP servers with Photon and Chrony
One of the CentOS 8 time servers in the homelab let me down recently, so I decided to replace it with Photon OS and Chrony


There are countless memes available on the internet that suggest that the cause of various IT issues is normally always DNS.
There are plenty that suggest NTP as a cause too. And, in light of Facebook's snafu last year, probably plenty around BGP now as well. It was NTP that bit me recently though.
I have time servers in my lab for a few reasons:
- Most of my customers operate their own time sources, therefore I should too.
- If, for any reason, my lab becomes disconnected from the internet then at least there are local time servers to synchronise with.
- Although the traffic overhead is negligible for NTP, I'd rather limit the number of applications and appliances reaching out for time updates.
The setup looks a bit like this:
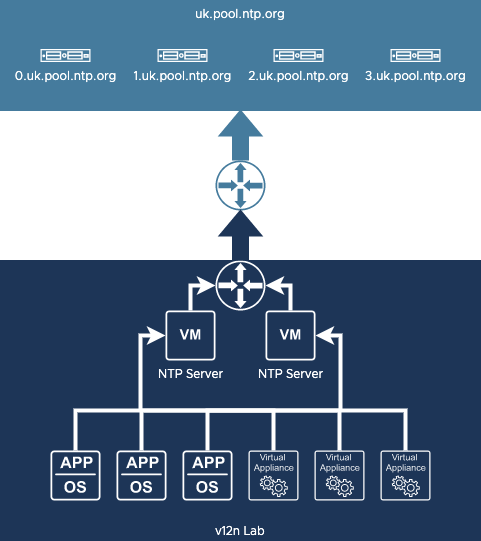
All of the various applications and appliances synchronise their time with the two NTP servers. They in turn synchronise with the UK pool of public NTP servers.
My NTP servers were running CentOS 8 and had the Chrony service configured to share time with any connected clients. All seemed good until recently when I had to spend several hours troubleshooting and issue that turned out to be related to NTP. In the end, I discovered that for some reason the Chrony service wasn't started or enabled on one of my time servers!
I hadn't yet updated those time servers to use CentOS 8 Stream, and of course CentOS 8 (the non-stream) version went End-of-Life a few months back. So I decided to rebuild my NTP servers from the ground up.
Photon OS
Photon OS is a lightweight Linux operating system that was created by VMware and is now the base OS for the majority of their appliances. Rather than use up my limited number of RHEL licenses on these NTP servers, I decided to go with Photon. It also helps that I already have a Photon 4 build in my Packer repository.
With the new NTP servers deployed and given temporary DHCP IP addresses, I could go ahead with configuring them ready to swap over with the outgoing servers.
Firewall
First thing to do is to open up the firewall to allow clients to synchronise time. In Photon this is achieved with iptables using the following:
iptables -A INPUT -i eth0 -p udp --dport 123 -j ACCEPT
iptables-save
The first line opens UDP port 123 to incoming traffic. The second is used to save the configuration.
Chrony
If it's not already installed, we need to add chrony:
tdnf install chrony -yThe default configuration file for chrony can be found at /etc/chrony.conf. I made a couple of changes to it so it looked like this:
# Use public servers from the pool.ntp.org project.
# Please consider joining the pool (https://www.pool.ntp.org/join.html).
pool uk.pool.ntp.org iburst

# Record the rate at which the system clock gains/losses time.
driftfile /var/lib/chrony/drift

# Allow the system clock to be stepped in the first three updates
# if its offset is larger than 1 second.
makestep 1.0 3

# Enable kernel synchronization of the real-time clock (RTC).
rtcsync

# Enable hardware timestamping on all interfaces that support it.
#hwtimestamp *

# Increase the minimum number of selectable sources required to adjust
# the system clock.
minsources 2

# Allow NTP client access from local network.
#allow 192.168.0.0/16
allow 172.16.0.0/12
allow 192.168.0.0/16
allow 10.0.0.0/8

# Serve time even if not synchronized to a time source.
# local stratum 10

# Require authentication (nts or key option) for all NTP sources.
#authselectmode require

# Specify file containing keys for NTP authentication.
#keyfile /etc/chrony.keys

# Save NTS keys and cookies.
ntsdumpdir /var/lib/chrony

# Insert/delete leap seconds by slewing instead of stepping.
#leapsecmode slew

# Get TAI-UTC offset and leap seconds from the system tz database.
#leapsectz right/UTC

# Specify directory for log files.
logdir /var/log/chrony

# Select which information is logged.
#log measurements statistics tracking- On line 3 I have set chrony to use the NTP pool for uk.pool.ntp.org for time sources.
- On line 20 I have configured a minimum of 2 time sources to be used for synchronisation. This is for upstream synchronisation and means that chrony will require two servers from the UK NTP pool to respond to change the local time. This reduces the risk of getting an incorrect time.
- On lines 24-26 I have allowed incoming requests from the RFC1918 private address ranges to be serviced.
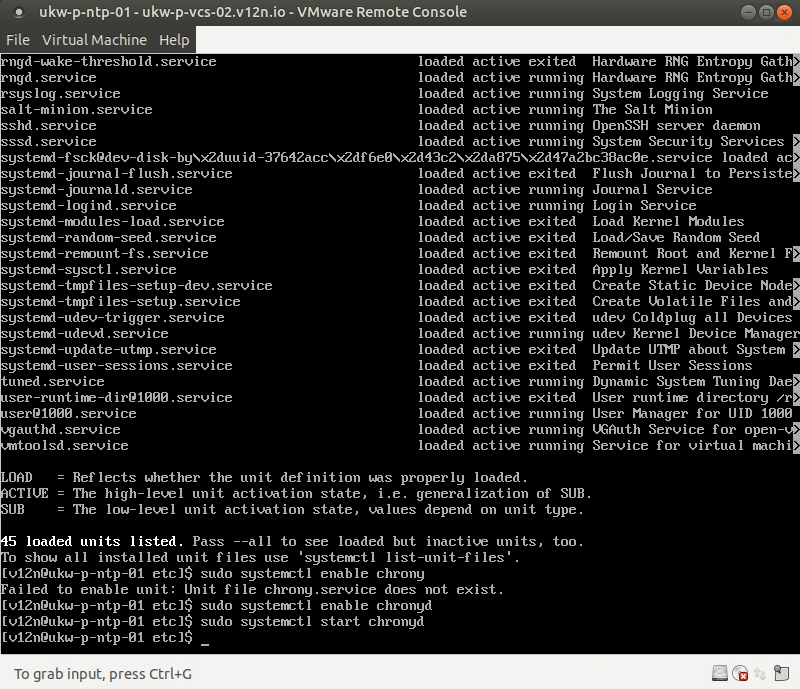
Once saved, we need to enable and start the chronyd service.
systemctl enable chronyd
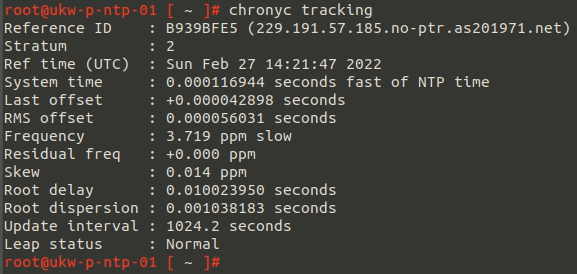
systemctl start chronydIf all is well, you can use the chronyc utility to see the status of time sync with the NTP pool.
Network
The penultimate step for me was to configure the networking to have a static IP address on boot. On Photon this can be achieved easily by creating a configuration file called /etc/systemd/network/10-static-en.network and putting something like this in it:
[Match]
Name=eth0

[Network]
Address=172.16.0.3/24
Gateway=172.16.0.254
DNS=172.16.0.1 172.16.0.2
Obviously you need to use IPs that fit your environment.
The file /etc/systemd/network/99-dhcp-en.network should then be removed if it is present.
Switchover
Switching over was just a matter of shutting down the old CentOS NTP server and rebooting the new one.
Of course, I then repeated the whole procedure for the second NTP server.
What's Next?
The trigger for creating these new NTP servers was that one of them had stopped working. Rather than hope that it doesn't happen again, I wanted to make sure that there was some easy way to keep an eye on them. I'll cover that in the next post.