Homelab vSphere 6.7u3 experience
About 18 months ago I wrote a post on my experience upgrading my homelab from vSphere 6.5 to vSphere 6.7. Since that time it has had a few rebuilds and reconfigurations, been off for several months, been idle, been busy and generally just worked. The one constant though was the build of ESXi that I was using. It was always 6.7 GA.
Having been switched off for some time, I brought it back up over the Christmas break after a long lunch with homelab hero @virtualhobbit. The point of this post is not the reasons why my lab has come back to life (I'll cover that at some point), but about how I got it updated to the latest version of vSphere.
As a recap, and to save anyone reading my previous post, my lab is constructed from Dell workstations that don't appear on the HCLs for VMware. As any homelabber will attest, sometimes compromises have to be made to run your own lab. In my case, updates aren't as straightforward as they should be but that's offset by the cheaper cost and age of the hardware. That said, I will most likely not be able to run the next version of vSphere owing to the deprecation of the vmklinux driver stack.
Coming back to the topic in hand, vSphere Update Manager tends to complain when I use it owing to my unsupported processors. Updating my hosts via esxcli however still works. My first attempt at an update was not successful however. I had downloaded the offline update bundle from VMware's site and placed it on a shared VMFS datastore.
But I was met with the following error when I tried to apply it:
[DependencyError]
 VIB VMware_bootbank_esx-base_6.7.0-3.73.14320388 requires esx-update >= 6.7.0-3.73, but the requirement cannot be satisfied within the ImageProfile.
 VIB VMware_bootbank_esx-base_6.7.0-3.73.14320388 requires esx-update << 6.7.0-3.74, but the requirement cannot be satisfied within the ImageProfile.
 Please refer to the log file for more details.
Maybe my esxcli is rusty. Luckily there's another way if you have ESXI hosts that can connect to the internet. The first step is to open up the hosts's firewall so it can connect out:
esxcli network firewall ruleset set -e true -r httpClient
Next, to prove connectivity and get the correct update name, the following command can be use to list the available software profiles:
esxcli software sources profile list -d https://hostupdate.vmware.com/software/VUM/PRODUCTION/main/vmw-depot-index.xml | grep ESXi-6.7.0-201912
The “grep” command at the end can be adjusted to filter the results. You don't want to soft through EVERY update available.
In my case that returned me four results:
ESXi-6.7.0-20191201001s-standard  VMware, Inc.  PartnerSupported  2019-11-25T11:42:42  2019-11-25T11:42:42
ESXi-6.7.0-20191204001-standard   VMware, Inc.  PartnerSupported  2019-11-25T11:42:42  2019-11-25T11:42:42
ESXi-6.7.0-20191201001s-no-tools  VMware, Inc.  PartnerSupported  2019-11-25T11:42:42  2019-11-25T11:42:42
ESXi-6.7.0-20191204001-no-tools   VMware, Inc.  PartnerSupported  2019-11-25T11:42:42  2019-11-25T11:42:42
The second entry is the one that I wanted. To apply it, just pop the name of the profile in to the following command:
esxcli software profile update -p ESXi-6.7.0-20191204001-standard -d https://hostupdate.vmware.com/software/VUM/PRODUCTION/main/vmw-depot-index.xml
If the update is successful (it can take a few minutes, be patient), you should see something like this (I've truncated the output as it's a bit long):
Update Result
   Message: The update completed successfully, but the system needs to be rebooted for the changes to be effective.
   Reboot Required: true
   VIBs Installed: VMW_bootbank_bnxtnet_20.6.101.7-24vmw.670.3.73.14320388...
All that remains in theory is to close the firewall access off and reboot the host:
esxcli network firewall ruleset set -e false -r httpClient
reboot
That worked for two of my hosts. But the third refused to play ball. When I tried to apply the update I got an error.
[InstallationError]
 [Errno 28] No space left on device
       vibs = VMware_locker_tools-light_11.0.1.14773994-15160134
 Please refer to the log file for more details.
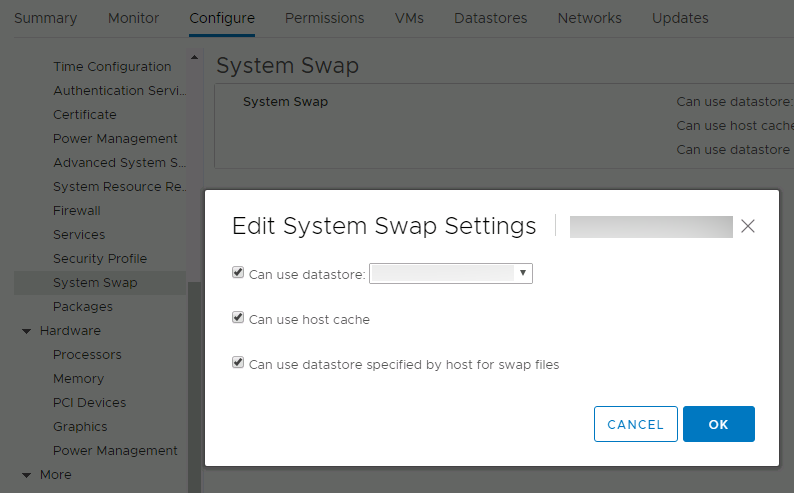
This was pretty simple to solve by adjusting the system swap settings for the host through vCenter. Head to the Configure tab for the host and locate “System Swap”. Edit the settings, and enable the host to use a specific datastore (the first option below).

I retried the update and it went through. vCenter updates were applied via the normal mechanisms (https://vcenter-fqdn:5480).
